The Most Active and Friendliest
Affiliate Marketing Community Online!

“Adavice”/  “CPA
AdsBridge

Official AdsBridge

@Alex_O99
I need some help choosing right plan and I hope you can help me with that :)

Can you tell me how "visits" are counted? In particular according to pop traffic. Let's say I'm going to run massive mobile pop campaign. Does every showing of a pop up landing page is counted as a visit?

I was thinking about PRO plan, but I'm afraid that 1mln visits can be too little for pop up traffic. And next plan costs over 300$.
 
Of course I can help! :) Visits are when someone arrives to your landing page from a banner/popup/ad. Clicks are when a user comes from your LP to your offer. If you do not use an LP, then the amount of clicks and visits will appear in the statistics as equal numbers. As for your plan, I'll message you privately:)
-Alex
 
Visits are when someone arrives to your landing page from a banner/popup/ad. Clicks are when a user comes from your LP to your offer. If you do not use an LP, then the amount of clicks and visits will appear in the statistics as equal numbers. As for your plan, I'll message you privately:)
-Alex

Thank you Alex for you answer.
Just to be 100% sure: every time my landing page is shown to user as a popup, AdsBridge counts it as a visit. Am I right?

Let's say I have 100$ daily budget and I pay 1$ for 1000 impressions of popups... So in tracker I will have 100.000 visits daily and 3mln visits per month? Is my math ok? :)
 
pop up-> LP -> offer = 1 visit 1 click
pop up -> LP x offer = 1 visit 0 clicks
pop up -> offer = 1 visit 1 click (clicks and visits are the same with no LP present)

Only if they click on your pop up (just like a banner) will it count as a visit. If they click on the LP that they were transferred to after clicking on the pop up will they be counted as a click.
No LP means click=visit (but only if they click on the pop up!)

Impressions do not equal visits.

Hope this clears it up!
-Alex
 
As you may know, the Automatic Campaign Optimization is a unique feature that was first introduced on AdsBridge platform. It’s been launched and running for quite some time, however, we still receive questions like:

“What benefits it gives?”, “Why affiliates need it?”, and “How it works?”

When we came up with an idea to create a tracker, we were determined to develop such a SaaS solution that would not only include the basic tracking functionality but also provide some unique features. Auto-optimization is one of such options that letAdsBridge stand out among other trackers.

Any affiliate, regardless of their experience, knows that the key indicator for a landing page is EPV and for an offer—EPC. Apparently, you can’t just calculate ROI for each lander and offer—this won’t be accurate since the traffic cost can vary and not all traffic sources can pass the dynamic value of each click (i.e. when purchasing traffic by the bidding system). Moreover, with some sources the cost upgrade is done after the event, which means that there is no way to optimize campaigns by ROI in real time because you are unable to make changes and act on time.

Basically, when developing the Automatic Campaign Optimization system, we relied on our own experience and feedbacks of a test team that concluded that the EPV and EPC indicators are the ones we must use.

So, what’s the working principle of auto-optimization? When the feature was in beta-testing, we generally mentioned that it uses various algorithms based on optimal control strategy and a probabilistic approach to monitor statistics and determine the best-performed landing pages and offers. In fact, the process is much more complicated than that!

Auto-optimization is an intelligent and self-learning system. It doesn’t make decisions on bare facts but learns, and then forms predictions on the basis of received data; that is based on the combination of statistics on the last step of optimization and calculated probable success of a lander/offer on the next step.

This way, the system distributes the percentage ratio between landing pages and offers in the distribution rule, sending more traffic to landers/offers with better EPV/EPC indicators. However, you should bear in mind that auto-optimization can be used only in the distribution rule that has enough amount of traffic and a minimum set of 3-4 landers/offers to choose from.

Even when the system selects the best lander/offer from the set, it still leaves a possibility for other landers/offers to return a certain amount of traffic on a condition that these landers/offers will show the dynamic increase of EPV/EPC.

To wrap it up, Automatic Campaign Optimization identifies the profitable landing pages and offers in real time and distributes traffic on them. This means you don’t have to analyze and monitor statistics for each campaign separately. The system saves your time and lets you increase profit from all landing pages and offers at a time. So, if you run multiple campaigns and want to see the maximum revenue growth, auto-optimization will become your best assistant.

To learn more about an automatic campaign optimization and how to set it up on AdsBridge, you may consult our user guide.
 
does anybody face traffic loss when using mobile pops? I see about 30-40% of stats difference between traffic source and adsbridge/aff network, and it was ok, when i used direct linking with same source/aff network.
I think it could be because of slow redirects(meta refresh is OFF)
 
does anybody face traffic loss when using mobile pops? I see about 30-40% of stats difference between traffic source and adsbridge/aff network, and it was ok, when i used direct linking with same source/aff network.
I think it could be because of slow redirects(meta refresh is OFF)
Make sure your timezone and period in Adsbridge statistics are configured correctly. If there are still problems, please send screen shots depicting your situation to our support team at support@adsbridge.com !:)
Let's get this fixed!
-Zach
 
new-piktochart_18263519_e0b877ff2031781ea0e5d5e88f03fc5bcaab4a121.png
 
AdsBridge will be celebrating Black Friday with a HUGE discount! Make sure to check in to our thread to get the discount code! It's going to be 50% off any annual subscription plan!
-Zach
 
First of all, we hope you all had an amazing Thanksgiving day filled with love, laughter, and food!

We’d like to make good on our promise, and give you a 50% off discount on any annual payment plan upgrade!

If you’ve been thinking about upgrading your account to the next highest level, this is the time to do it!

Use the PromoCode : Friday50

AdsBridge is Celebrating Black Friday!

Have a wonderful weekend, and Happy Black Friday!

Yours truly, AdsBridge Team
 
Hello all!

We have extended our Black Friday sale until midnight tonight! It's a 50% off discount on any annual plans.

The promo code is : Friday50

Our blog post explains all the details
smile.png


AdsBridge is Celebrating Black Friday!

Have a wonderful and productive Monday!

-Zach
 
AdsBridge Updates!
We’ve updated once again, and there are lots of new functions! Enjoy!

The possibility to add your own favicon onto your Landing Page.
It will now be possible to add personal favicons within the visual and HTML Landing Page editor that will be shown upon transfer to your landing pages.

In order upload your favicon into the editor, it is necessary to upload the file with the name ‘favicon’ in ico, png, or svg format.

NOTE: In order that your favicon functions properly in all browsers, it is necessary to upload it in all three formats.


The issue with Facebook prefetching has been resolved.
Upon display of banners in the mobile app, Facebook would ‘click’ the banner before showing it to users, therefore increasing the amount of clicks within our statistics. This created dissimilarity between the ‘impressions’ and ‘clicks’ data within AdsBridge.

AdsBridge now filters visits made when the banner is being displayed, thus making Facebook tracking precise and transparent. Now the number of unique clicks on Facebook coincides with the number of unique visits to AdsBridge with the dissimilarity being within a few percentage points.

We have added a “hide funnel” option for jumps created in the AdsBridge editor.
A new function has been added to the first step of campaign creation. It allows you to hide funnel and jump pages from networks. In order to activate this function, you need to select the ‘on’ option here: (pictured below) and enter the link to which all traffic will be sent without verification.

NOTE: This function allows you to hide jump-pages created within our visual or HTML editor. It will not work with self-hosted landing pages.


We have added a proxy traffic detection function.
In the bot-filter section we have added the option ‘proxy detect’.

Turning on this function will separate all proxy traffic, and will count it as bot traffic (this information will be able to be seen within your statistics), as moderators and bots often use proxies to track your funnel. These groups of traffic will then be sent to a default path set within your campaign.

NOTE: The functionality of this option will not be affected by the switching-on/off of the bot filter.


We’ve made the bot-filter easier to understand.
The appearance of the bot-filter page has been redone, and the bot-filter settings have been placed in the first step of campaign creation.


There is now no subdomain limit for domains purchased through AdsBridge.
After purchasing a domain through AdsBridge, you are now able to add an unlimited amount of subdomains to the domain. This can now all be done independently, without consulting support. To do so, choose the ‘purchased’ option in the domain addition pop-up, and enter subdomain to a domain within the drop-down list.


New OS/browser specifications added:
In OS, browser specifications the options ‘higher than’ and ‘lower than’ have been added. These options regard to the version of OS or browser.

To set up this specification, you will need to choose the option ‘higher than/lower than’ in the ‘Conditions’ field, and then enter in the OS/browser version you desire.


New FAQs!
We have updated out Frequently Asked Questions database. You will be able to find them by clicking here:


Paths added:
We have added ‘paths’ to the ‘offer active in campaigns’ pop-up, for comfort.


Empty useragent option added:
We have added an ‘include empty useragent’ option into the traffic distribution specifications.


New double left-click feature:
Now in all sections of the ‘Manage’ sections, you may get to statistics by simply double left- clicking.

Planned Updates:
Addition of split paths.

The addition of graphics to the statistics.

Global update of the device base.

The addition of a ‘Stream’ function.

The development of API for our users.

Manual cost update for all users.

The addition of charts to the main dashboard. This visualization will allow you to see the dynamics of changes to key indicators. When available, you’ll be able to open this graphic by clicking the button ‘Chart’.

Have a great rest of your week!
-The AdsBridge Team
 
Last edited by a moderator:
How To Create Landers With AdsBridge – Step by Step Guide

AdsBridge the all in one tracker, and landing page builder tool. It is a must for any affiliate marketer that does a lot of testing!

I wrote this guide assuming that You already have an account with AdsBridge so that we can skip the registration process.

Those who are reading this guide but don’t have an account with AdsBridge can create one HERE.

Here we go!

1. Getting to the Landing Page creation
After logging in, the first thing you will see is your dashboard, now, if you are a new user, these fields will be blank to you.

1. Getting to the Landing Page creation
After logging in, the first thing you will see is your dashboard, now, if you are a new user, these fields will be blank to you.


Now, how to begin working on your landing page:

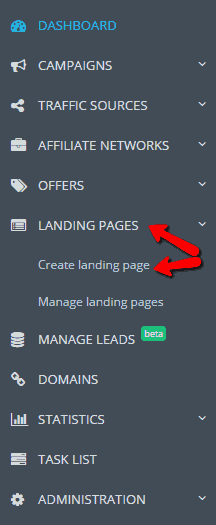
1. Click on the Landing Pages tab on the left-side menu.

2. Click on Create landing page


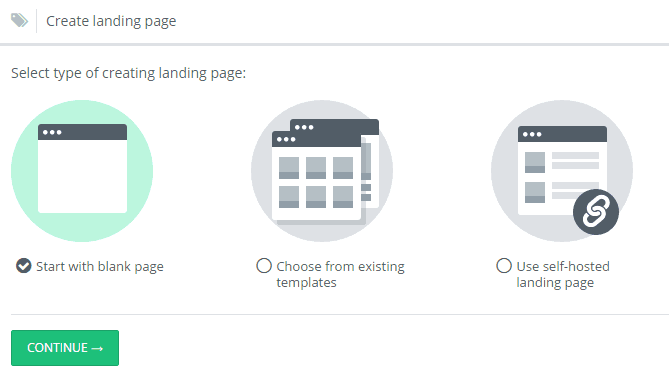
You will now be confronted with three options:

1. Start with blank page (create your landing page from scratch)

2. Choose from existing templates (choose and edit a template)

3. Use self-hosted landing page (upload your own landing page via URL)


2. Choosing the type that suits your needs
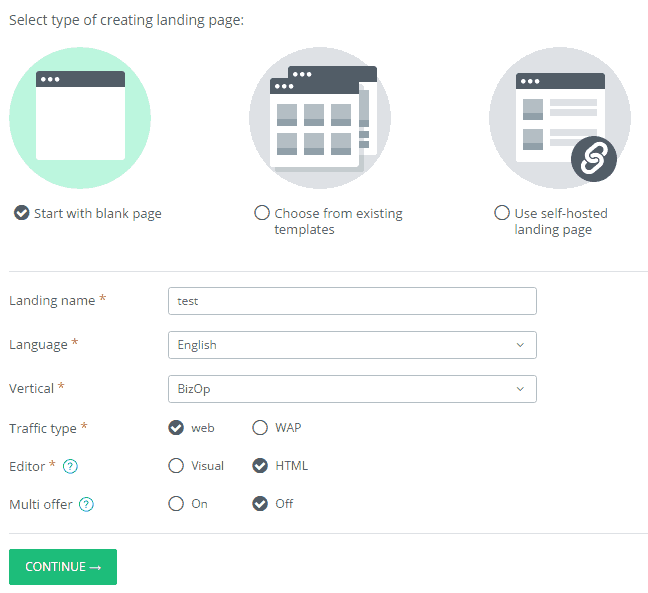
Start with a blank page:


When you select the blank page type, by clicking continue you will need to fill up a few fields:

  • Landing name – enter the desired name for landing page
  • Language – choose for which language will the landing page be for
  • Vertical – choose the niche
  • Traffic type – pick between web or WAP
  • Editor – if you pick Visual, then you will have elements like Image or Text on the side, and you just drag and drop them into the field. If you pick HTML, then you can write code but the elements on the side will be unavailable to you.
  • Multi offer – choose ON if your lander supports more than one offer, or OFF if it supports only one.
When you are done, just click Continue.


Depending on which option you choose Visual or HTML, you will get a blank page with a big empty field.

If you have chosen Visual – the blank page will look like a piece of paper with active elements on the sides. You can drag these elements onto the paper to construct your landing page. There are buttons, text, images and plenty other elements to use until you get the landing page you want.

If you have chosen HTML – then your paper will look a bit different, more in Notepad style. But that’s not the only difference, the elements on the sides are not available anymore. But now you can input code onto the paper, while in the Visual editor that was not possible. Practically I believe the HTML option to be better, because you can, for example, insert code from an existing lander and just edit it here.

Both Editors have the Preview option, which will show your landing page in another window. When you are finally pleased with your landing page, you can click on Save and then Exit Editor.


Start with an existing template:

If you are using a free AdsBridge plan, this option will be unavailable to you. You must be either Starter or Professional to be able to view all the templates AdsBridge is offering.


The templates match the chosen traffic vertical and type. You have the liberty to browse through them all even if you are not interested in a particular vertical by filtering all of the verticals. When you decide on which template to use, click on “Use this” to start editing.

An editor will then open, that looks the same as if you would choose the blank page type lander creation. But the difference is that the editor will be automatically filled with all the elements of the chosen template which you can edit at your leisure. When you have made all the necessary changes, click Save and then Close Editor.

Start with a self-hosted landing page:


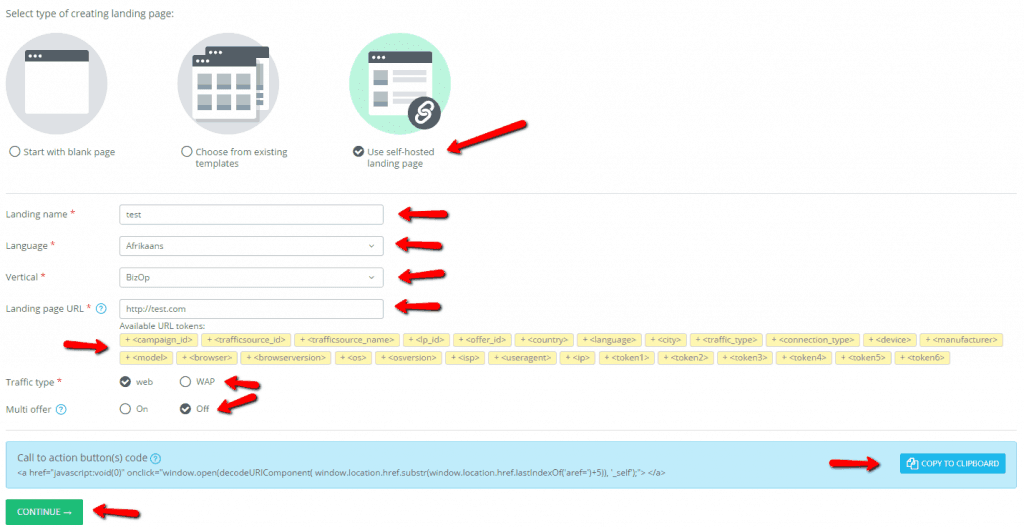
If you already have a lander of your own, you can safely upload it by choosing the self-hosted landing page type.

By clicking Continue you will have a few fields to fill up with necessary information:

  • Landing name – enter the name of the landing page
  • Language – enter the language your landing page is targeting
  • Vertical – Choose one of the verticals
  • Landing page URL – copy the URL of your landing page into this box (if you wish to add tokens to your landing page, you can do so by choosing the placeholders below the box. Those placeholders will later be replaced with the appropriate values.
  • Traffic type – choose between web or WAP
  • Multi offer – Pick ON for multiple offers or OFF for a single offer.
Before continuing it’s good to copy the CTA button(s) code for future use.

Click Continue.


3. Managing your Landing Page(s)


This page contains all of the landers you have made previously. There are multiple categories, some of which include landing page ID, name, vertical, traffic type, language, type, multi-offer, date and even the amount of campaigns a specific landing page is added to.

Short description of each category:

Type – sorts landing pages by which type it has been created (Template, self-hosted or created in editor)

Multi-offer – lets you know which landing pages have multiple offers and the exact number of offers.

Landing page ID – shows the ID of the landing page, helps in tracking the exact landing page you want to edit

Name – name of the landing page(s)

Vertical – displays the verticals chosen for each landing page

Traffic type – displays the traffic type chosen for each landing page

Language – displays the language chosen for each landing page

Date – date of landing page creation

There are certain actions you can do to landing pages you select:

View statistics – get a detailed overview of your landing page options

Preview – by hovering over the icon, you get a resized version of your lander

Edit – change the name, language, vertical, traffic type and multi-offer of the landing page

Copy – Make a copy of the desired landing page

Archive – remove the landing page from the list, but it can be recovered at any time.


And there you have it. A brief but very informative guide on how to add, create and edit landing pages in the AdsBridge interface.
 
Hey!

I have a questions about mobile traffic. Is this possible to identify user's carrier when he is connecting via wifi? Or in other words - can I make redirect rule, redirecting user by carrier, even though he is using wifi at the moment?
Can you help me with that please?

MrG
 
Hello!
The quick answer to this is no, unfortunately. If a user is connected to the internet through wifi, then the tracker cannot see the mobile carrier. The mobile carrier is shown through the mobile internet connection.
You can redirect using ISP for instance, however.
Let me know if you have any more questions!
-Zach
 
What Makes AdsBridge Unique?

Tracking solutions of all types share the same basic functions. These mutual features are a part of the essential tool that is called tracking. Each solution allows you to test campaigns, split test offers, and analyze statistics. So what sets us apart from the rest? Our Research Team has broken down our exclusive features, and we are here to share them with you!


Landing Page Editor:
With our Landing Page Builder, you are not only able to upload your self-hosted landing pages, but create your own. We offer two options of landing page creation. The first is a blank landing page creator, that allows you to create and edit any landing page you can think of. The second option is your access to our pre-made landing page templates. You simply click on the template of your choice, and edit it to your liking. All landing pages created within our system are hosted with us.

Automatic Optimization:
Our Tech Team has created algorithms which allow your campaigns to be automatically optimized! These algorithms are able to discern the best performing landing pages + offers, and in turn direct more traffic their way. This can help take some of the stress off of manually checking and adjusting each and every one of your campaigns!


Multi-User Access:
With our Multi-User Access feature, more than one user is able to access work under one account! Each Multi-User Account gives users to enable or disable permissions for editing or viewing data within a specific campaign/project. This feature works great for teams.


Daily Capping:
This feature prevents your campaigns from going over the pre-set lead limit. This can save you money, and opens up the possibility of sending your extra traffic to another offer.


Unlimited Custom Redirect Domains:
AdsBridge offers you the ability to purchase a custom domain within our system. In addition to this, you are able to add and use an unlimited amount of custom redirect domains!


Highly Responsive Support:
Our technical support team has been praised for their quick response time and over quality of their assistance. We know our product in and out, and can help you through any question you may have. You can reach them at support@adsbridge.com !


With all of these special features, you are bound to increase you efficiency and your bottom line.

Have a productive Monday, everyone!

-The AdsBridge Team
 
Glad I could help! :)
-Alex

Hey Alex!

Was just wondering if you're doing anything to counter the effects of PopAds "Landing page prefetching"?
When enabled, the page is loaded quicker, but it 1 visit shows up in the tracker as 1.4 (on average) (40% more visits than actual).
 
banners
Back