There is no doubt that adding another traffic source to your list is exciting. Besides boosting monetization, this has the potential to greatly increase engagement and bring you more conversions.
When you categorize traffic sources, ProPush.me analyzes every zone in your source and selects optimal ad feeds for each one. This way, your subscribers receive the most relevant push notifications — and are more likely to click and convert. As a result, you will enjoy bigger conversion rates and profits from your extra monetization efforts.
However, it’s always a good idea to stay on the safe side and check the performance of your traffic to ensure you’re getting the best results. It works both for your existing and new sources — so it makes sense to take care of both.
But how can you do it?
Whenever you add a new landing page to ProPush.me, you can attach tags to it. Each tag pertains to a specific traffic zone, in other words, it pertains to a specific placement on your site. You can choose any zone for your tag.
To add a tag, enter the My Sites tab in your ProPush.me account, then choose your landing page, and press the Create Smart Tag button. This will create a tag with a zone number inside.
Here’s an image:
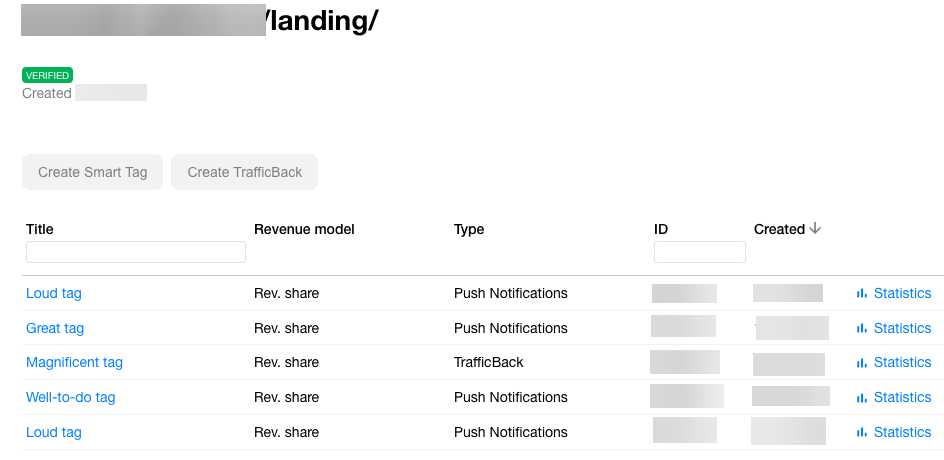
Now, using tags, you can separate traffic sources by zones. You can do it directly through your ProPush.me account using the SourceID parameter.
It’s time for the step-by-step guide:
1. Note the Source ID of your tag in your account:

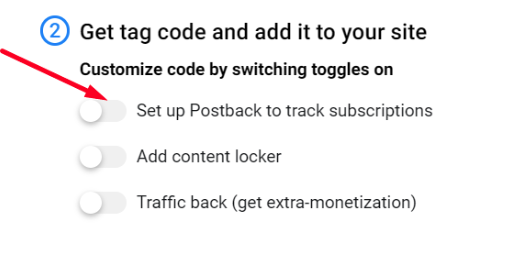
2. Then, go to your dashboard and find the corresponding field. Toggle the “Set up Postback to track subscription” setting to on.
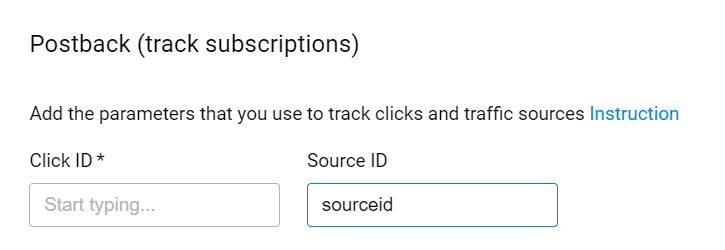
3. Input the SourceID in the right field:
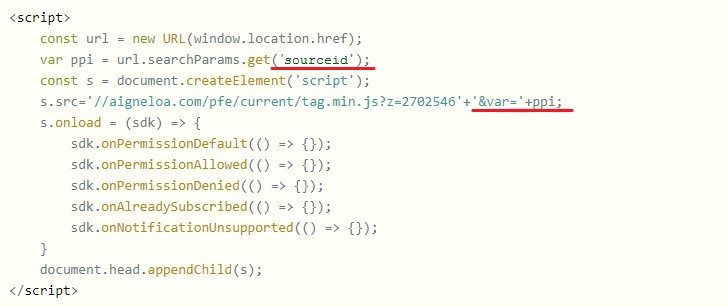
4. Verify that the JavaScript tag has been changed accordingly:
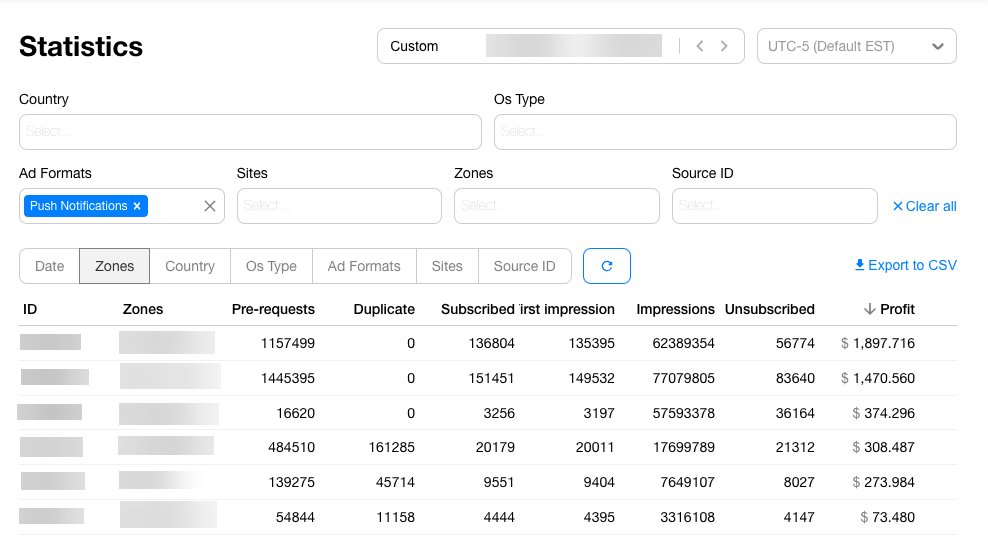
5. Finally, review your statistics on your dashboard — this is what everything will look like when you separate your sources by zones. Now, your traffic sources are organized and sorted out, giving you an opportunity to track each separately:
Use the guide (click here for full version) and boost your monetization efforts with ProPush.me
JOIN PROPUSH.ME TODAY
When you categorize traffic sources, ProPush.me analyzes every zone in your source and selects optimal ad feeds for each one. This way, your subscribers receive the most relevant push notifications — and are more likely to click and convert. As a result, you will enjoy bigger conversion rates and profits from your extra monetization efforts.
However, it’s always a good idea to stay on the safe side and check the performance of your traffic to ensure you’re getting the best results. It works both for your existing and new sources — so it makes sense to take care of both.
But how can you do it?
Whenever you add a new landing page to ProPush.me, you can attach tags to it. Each tag pertains to a specific traffic zone, in other words, it pertains to a specific placement on your site. You can choose any zone for your tag.
To add a tag, enter the My Sites tab in your ProPush.me account, then choose your landing page, and press the Create Smart Tag button. This will create a tag with a zone number inside.
Here’s an image:
Now, using tags, you can separate traffic sources by zones. You can do it directly through your ProPush.me account using the SourceID parameter.
It’s time for the step-by-step guide:
1. Note the Source ID of your tag in your account:
2. Then, go to your dashboard and find the corresponding field. Toggle the “Set up Postback to track subscription” setting to on.
3. Input the SourceID in the right field:
4. Verify that the JavaScript tag has been changed accordingly:
5. Finally, review your statistics on your dashboard — this is what everything will look like when you separate your sources by zones. Now, your traffic sources are organized and sorted out, giving you an opportunity to track each separately:
Use the guide (click here for full version) and boost your monetization efforts with ProPush.me
JOIN PROPUSH.ME TODAY


