PROMO CODES INSIDE
This is BIG! Now you can also Track and Auto_optimice all your Native Ads Campaigns with @LandingTrack !! Yes!
That is why we would like you to know that one of our First integrations for NATIVE ADS is:

Adskeeper Team: "We are excited to announce that LandingTrack has partnered with Adskeeper, a fast-growing native ads and push notification platform, to offer you an exclusive deal!
Being partners with more than 3k websites, AdsKeeper helps advertisers and affiliates acquire engaged audience through personalized content recommendations and push notifications. AdsKeeper is a leader in the adult industry market, expanding its inventory and providing 2 billion adult recommendations daily."
Let' s get started!
STEP 1 — Adding AdsKeeper as Traffic Source
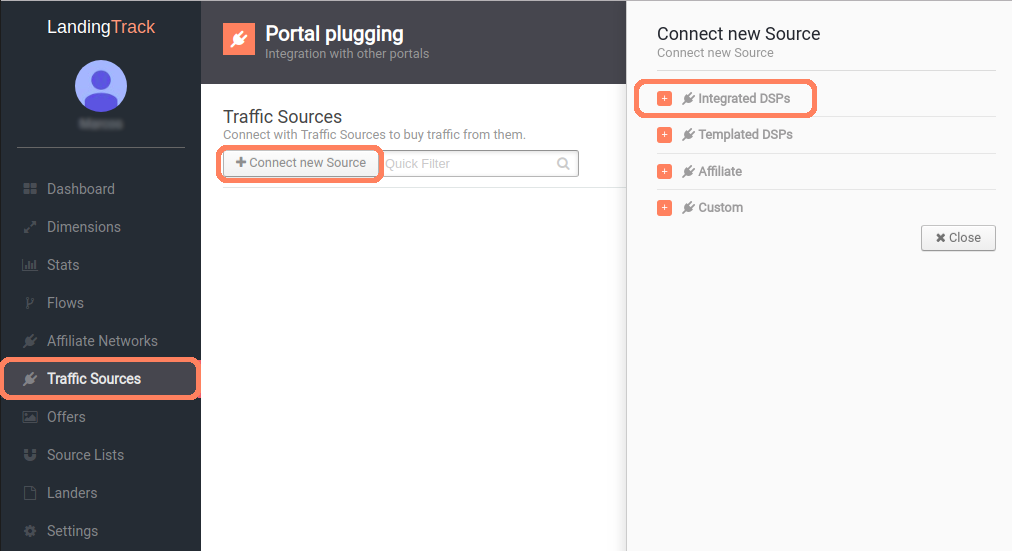
Go to Traffic Source Tab and click on > +Connect new Source; from the list of options select > Integrated DPSd
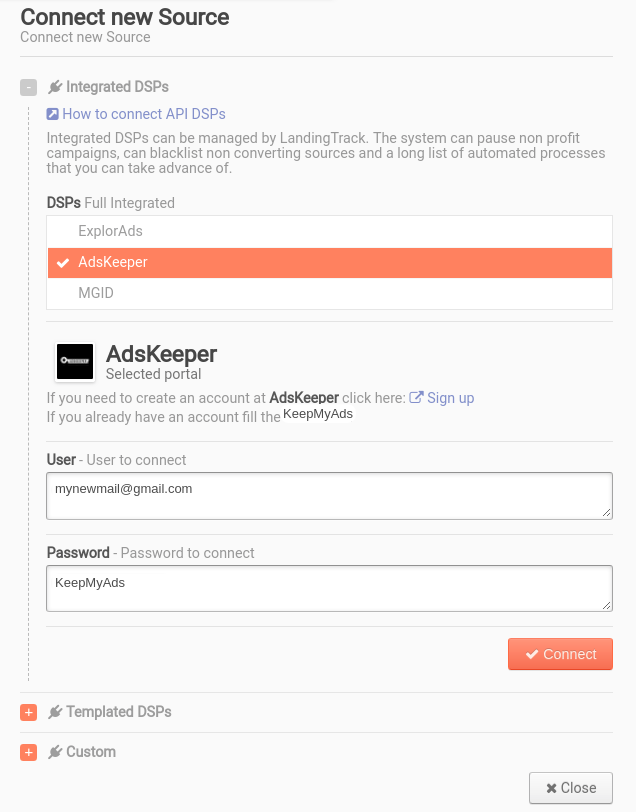
Look for AdsKeeper. In order to connect with them, you will need a total of 2 fields to be filled.
1- Your AdsKeeper email for the field Users
2- Your AdsKeeper Password for the field Password
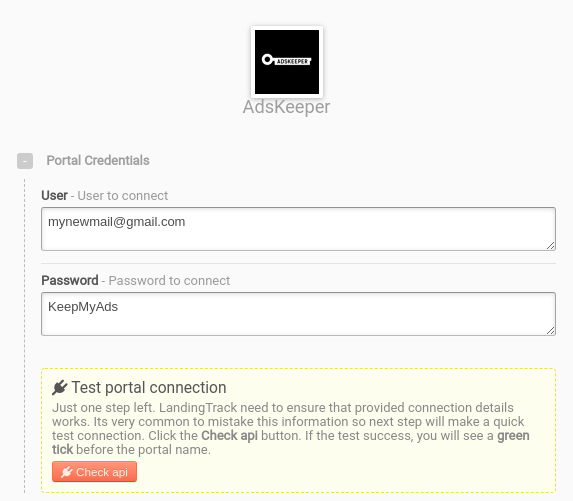
After saving LandingTrack will ask you to double-check your credentials, just Click on Check API button

Check your credentials and click on Check API button again.
Green Check¡ means we are fully Integrated with AdsKeeper but, We will suggest you add some more steps such us — URL Tokens and Outgoing Postback
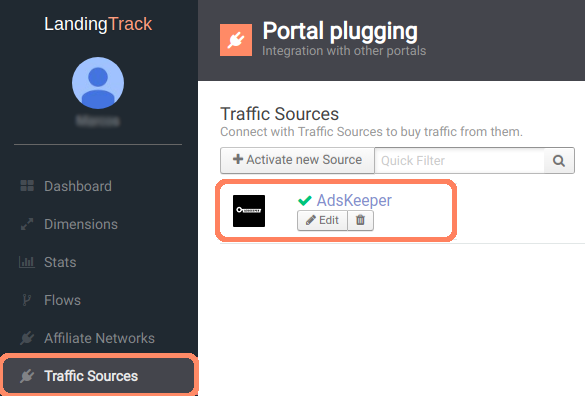
Now that we are synchronized with AdsKeeper let’s have a look on > Edit button.
The following Parameters and Tokens will be provided by default for each AdsKeeper URL :
Since you will need to add Banners no worries, this option comes later on, Once we generate the Campaign URL
STEP 2 — Creating a Dimension on LandingTrack
Your DImension Profile:
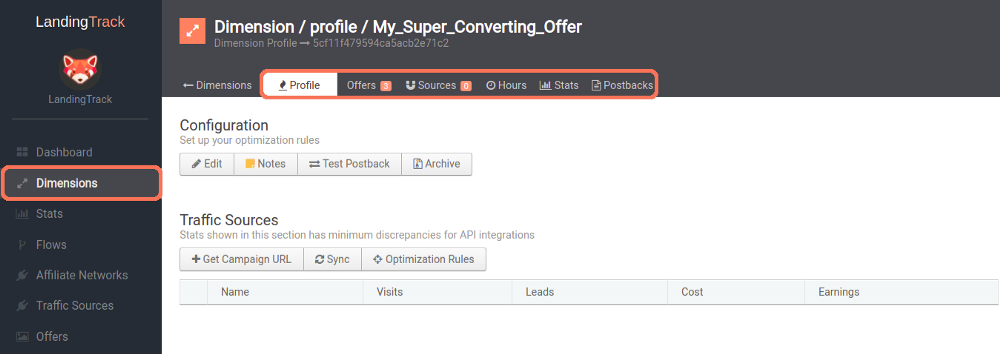
Want to know everything About Dimensions? see full guide HERE
— Dimension Configuration Options:
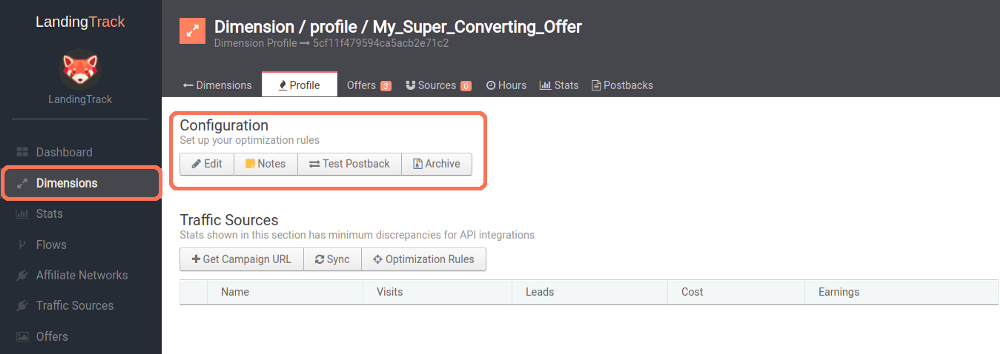
See full guide HERE
— Dimension Traffic Sources Section:
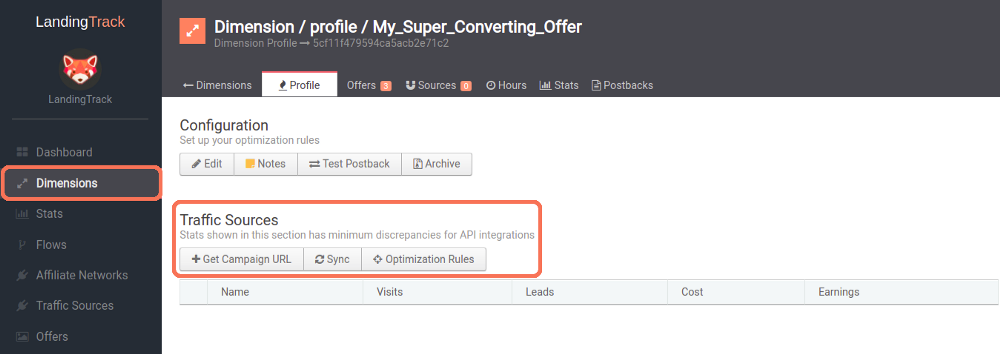
See full guide HERE
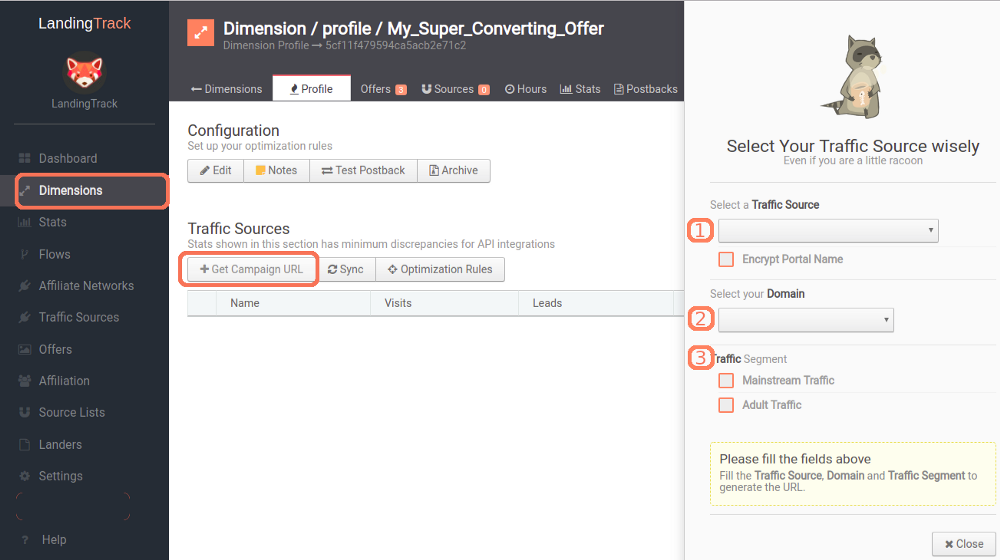
— Get Campaign URL:
— Optimization Rules:
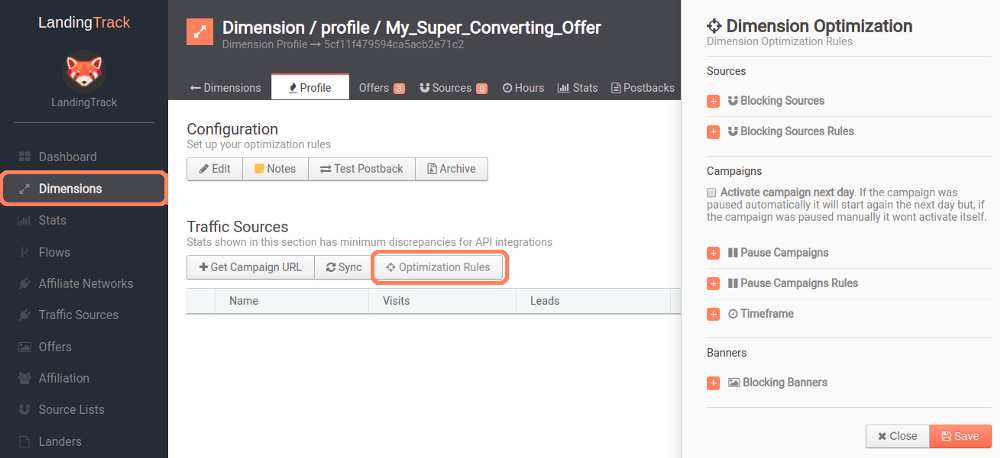
As you may know already, LandingTrack can optimize the traffic base on different rules and NOW even more!, here its when automation comes into action :
You can start working on your Optimization rules, remember that LandingTrack will automatize your banners and source, every minute.

We have selected the option Banners, meaning that LandingTrack for the example above will pause/block your banner if the impressions receive are higher than 2.500 and the Visits (Clicks) on your banner are less than 15.
You can always check our guide here — to refresh the concept.
— Getting the URL for Adskeeper:
Click on button > + Add Campaign and select Adskeeper as your traffic source, then select your Domain and your Traffic Segment; Finally, copy the name and URL we provide you with:
IMPORTANT: Copy the Full name that we provide you with and the Full URL:
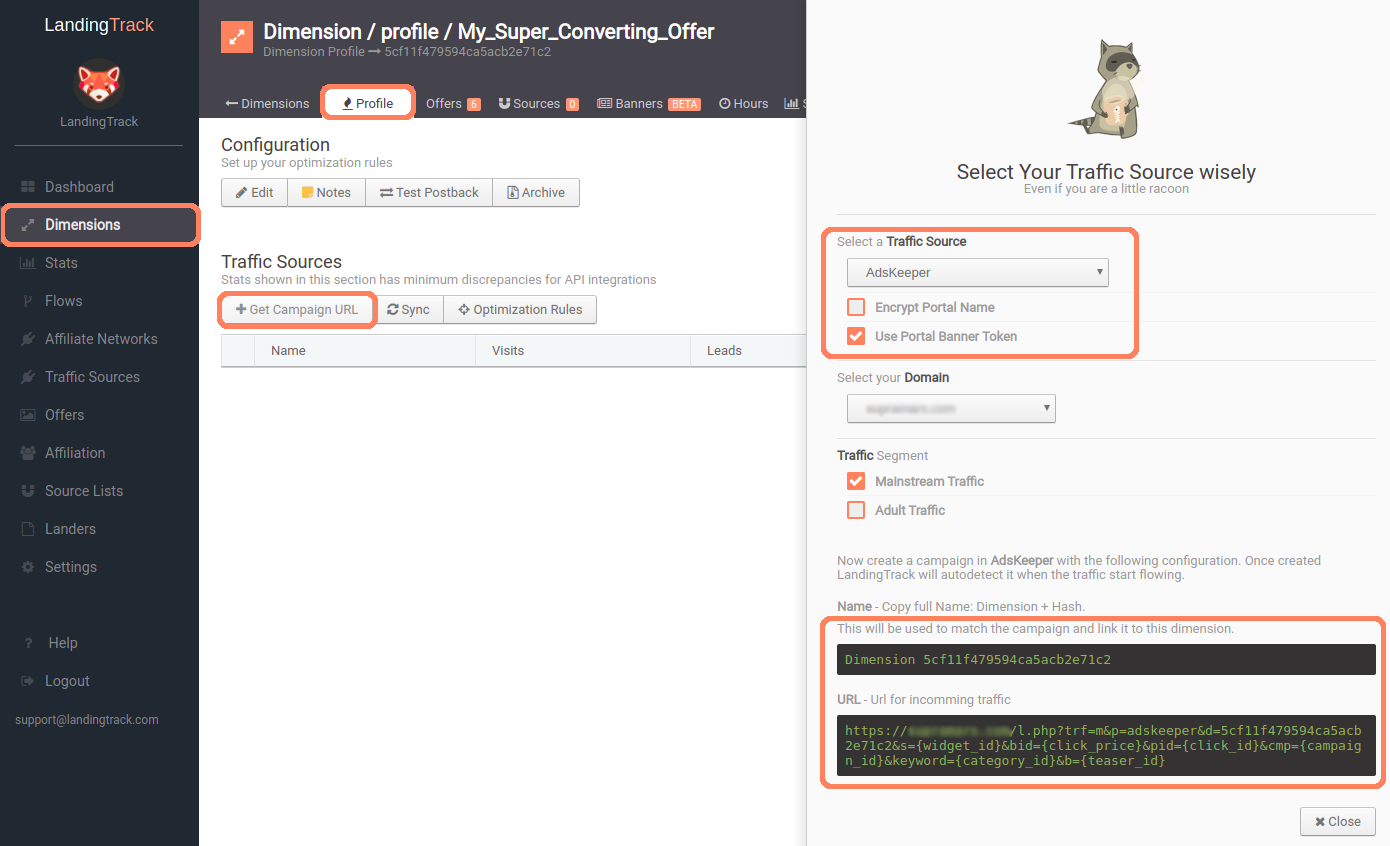
REMEMBER: Use the Dimension name on Adskeeper Campaign Name and LandingTrack URL for the Campaign URL.
--------------------------------------------------------
STEP 3 — Creating a campaign on Adskeeper
Once you have log in to your Adskeeper Account click on > ADD campaign

Remember we are an Advertiser for Adskeeper (Buying Traffic from them)
The first thing to do will be adding your Campaign name — Do not forget to copy/paste the whole name LandingTrack provide you with. IE: Dimension 5d7251….
Select your Campaign type:
1- NOT DEFINED
2- PRODUCT PROMOTIONS
3- CONTENT PROMOTIONS
4- PUSH
And right after that your Campaign Category and Campaign Language. This will be basically where you would like to advertise your advertiser materials.
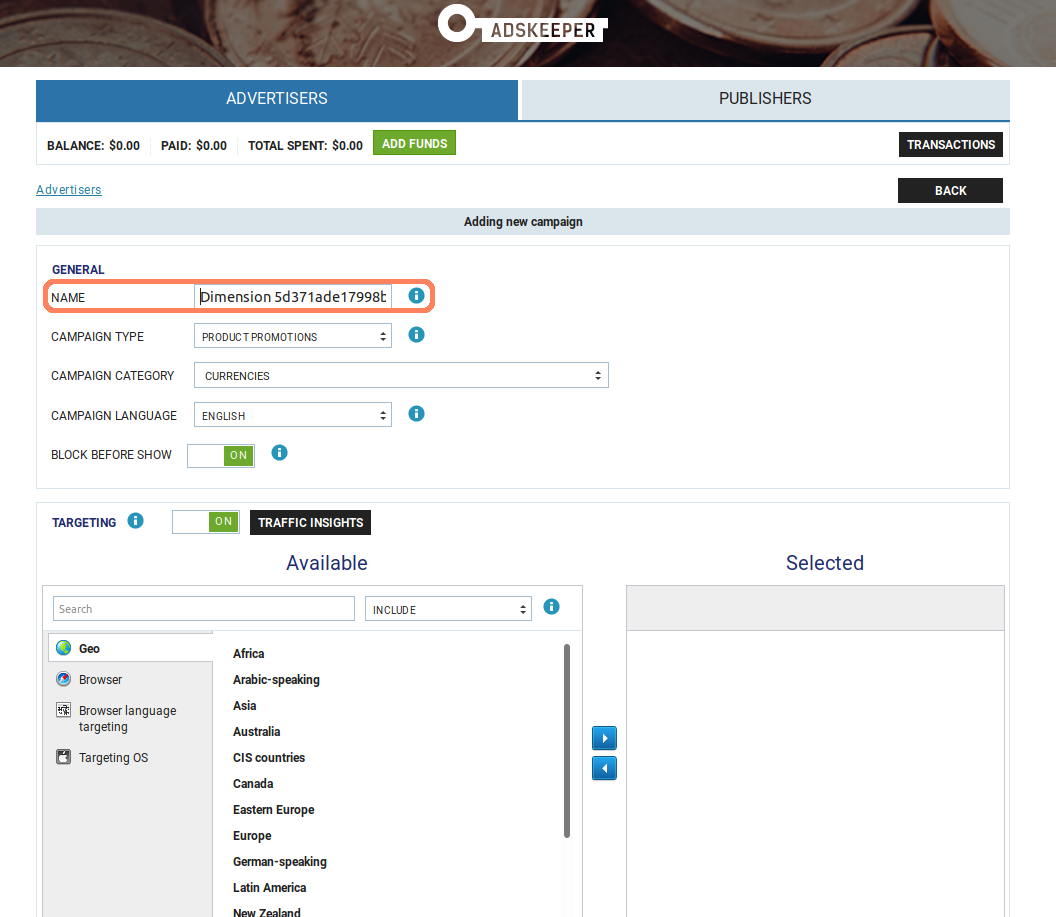
We have selected the option — Block before shown (ON) which means that after the campaign has been approved by the Adskeeper team, it will not start, instead it will be paused.
Next move will be for TARGETING:
Select your country/geo where you would like to promote your advertiser materials
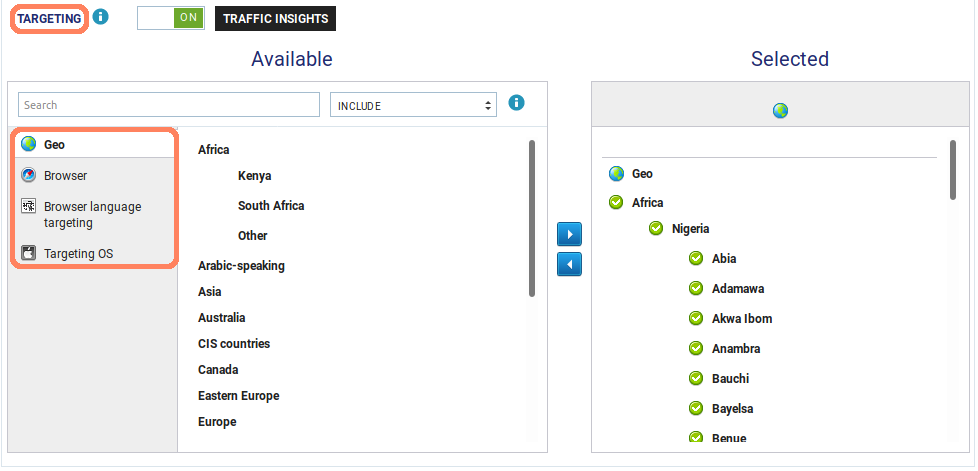
Adskeeper has a cool Feature here, click on button > TRAFFIC INSIGHTS to find out all the traffic and bids per geo:
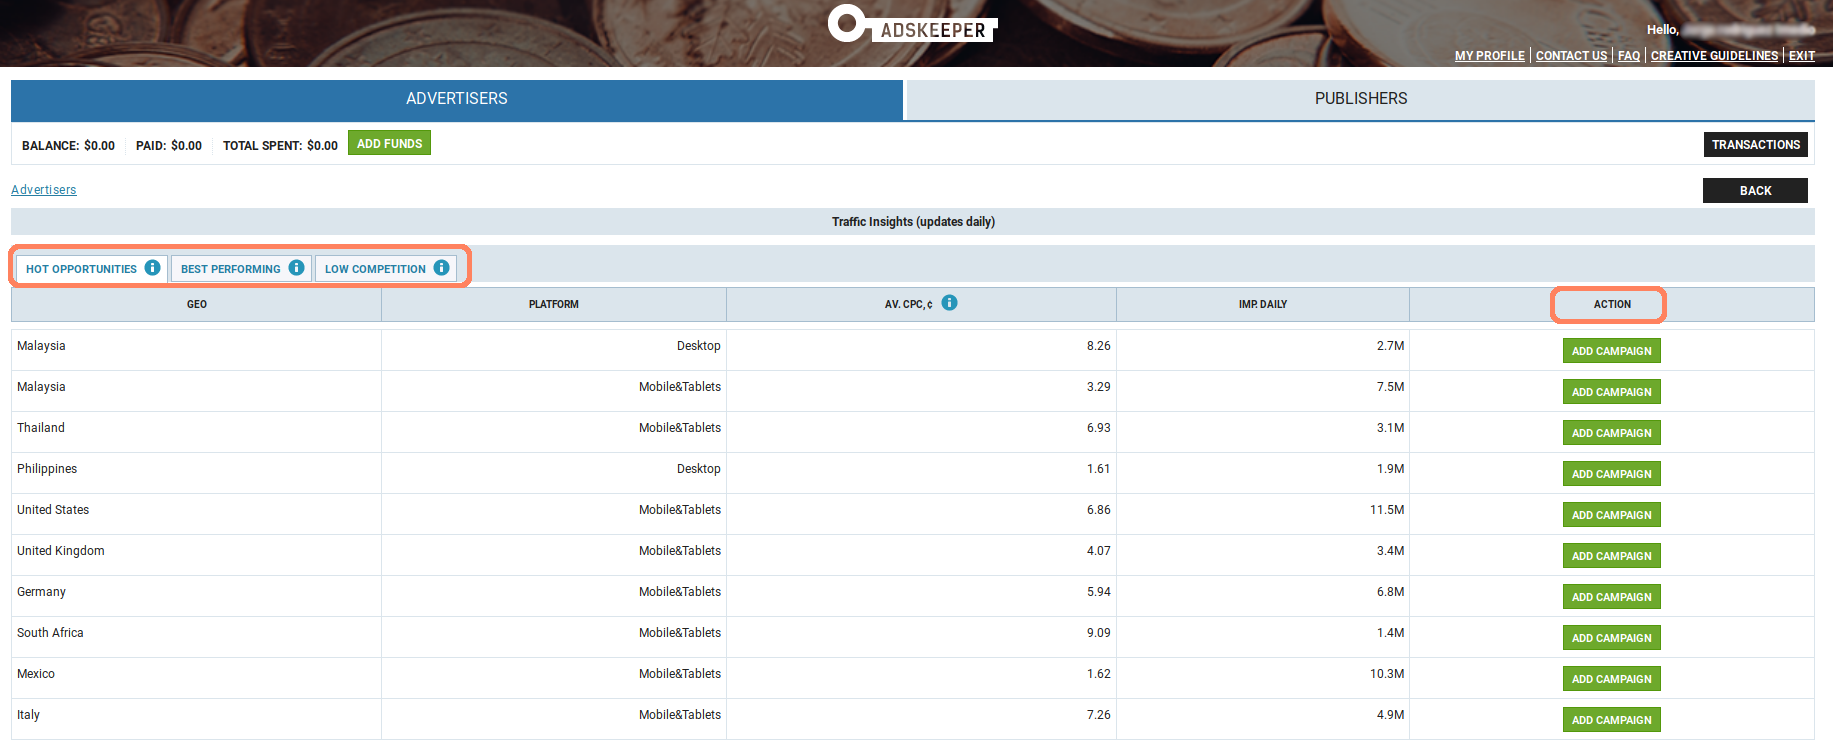
Pretty useful ha? and even a quick button > ADD CAMPAIGN to target a specific country.
After filling your Targeting options click on button > CONFIRM to keep setting up your Campaign at Adskeeper.
Next step will be Schedule, you can either set it up on Adskeeper :

Or start using all the automation that LandingTrack can offer to you > OPtimization Rules:
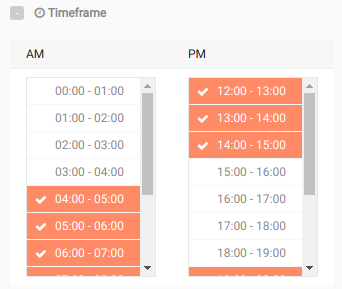
Once you have decided when you would like to be running your Advertising materials with Adskeeper it is time to move to the following options:
1- LIMITS: set caps for your campaign base on Clicks / Budget or Conversions. But again, it is time for you to set up all those rules on LandingTRack to start working with automation.
2- TRACKING TAGS: You can set up UTM or any custom tracking tags.
2.1 UTM Tagging: Choose this in case you are using Google Analytics to track the performance
utm_content tag value is automatically filled with teaser ID
utm_term tag value is automatically filled with widget ID
2.2 Add custom tracking tag : If you need to add any custom tracking instead of Google Analytics you need to use this option:
Allowed characters: 0–9, A-Z, a-z, -, _, =, +, &, /, :, ^ . The following macros tags are also allowed: {widget_id}, {teaser_id}, {campaign_id}, {geo}, {geo_region}, {ifa}, {click_id}. {click_id}- When you use these macros, please pay attention (take into account) that click status might be reconsidered as non-relevant after the fact. If you are not sure — seek assistance

Once you have finished we should look at the next step: CONVERSION SENSOR:
This section is for you to send conversions back to Adskeeper platform so you can check your stats also with them.
This is the Postback from Adskeeper: http://a.adskeeper.co.uk/postback?c={{PID}}&e=action350856&r={{PAYOUT}}
Just copy-paste yours, and let’s set it up on LandingTrack. Menu side click on > Traffic Sources and select Adskeeper, then click on
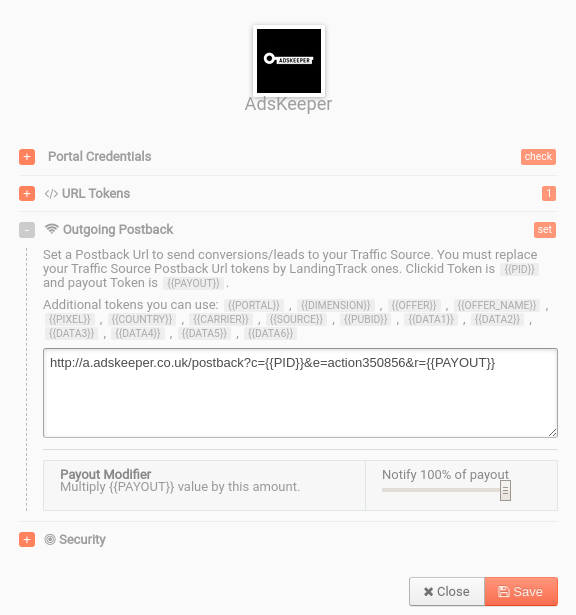
Easy right?
Once we have finished:

Time to create your Teaser Campaign, remember we are running Native Ads and would be needing an image, headline and body text for your advertiser material.
After clicking on button > CREATE we will have to add your LandingTrack Campaign URL, write your Teaser Title, select your category and finally upload your image.
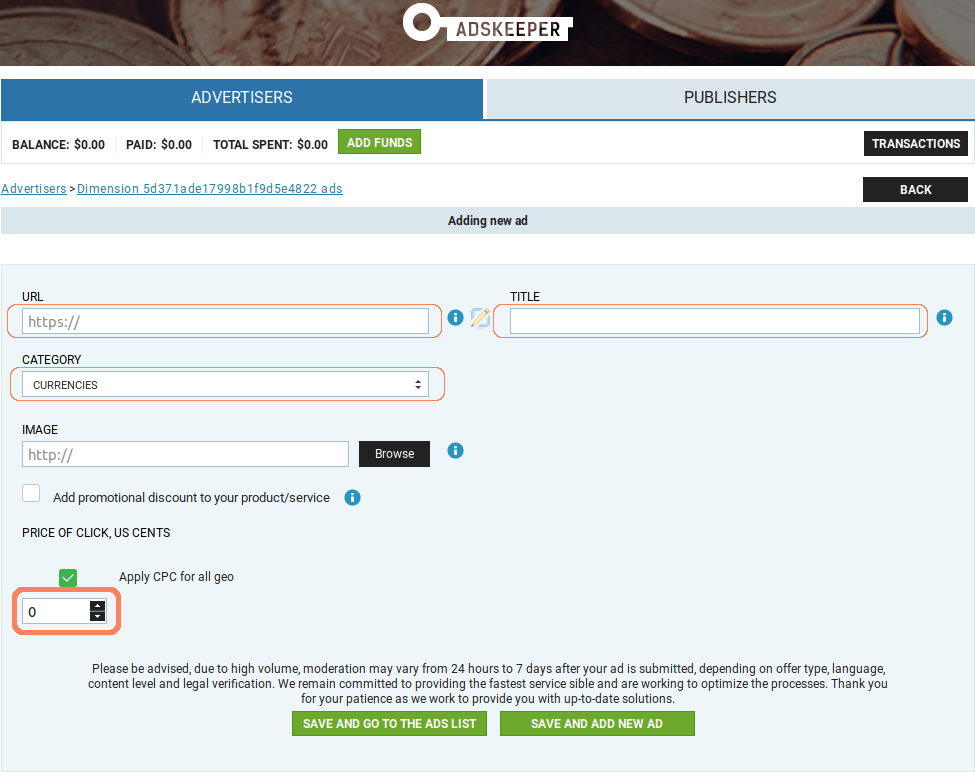
Adskeeper has a cool Feature to crop your image, use it wisely.
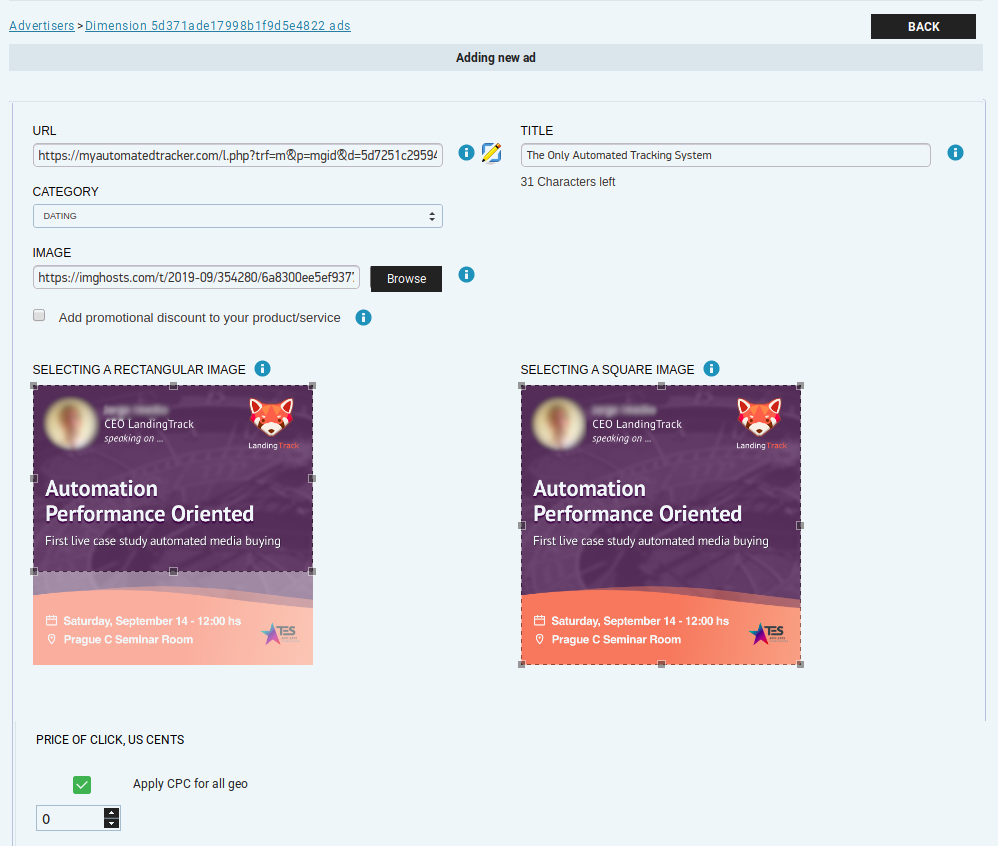
Finally after adding your image and crop it, select the CPC price for all your Teaser Materials.
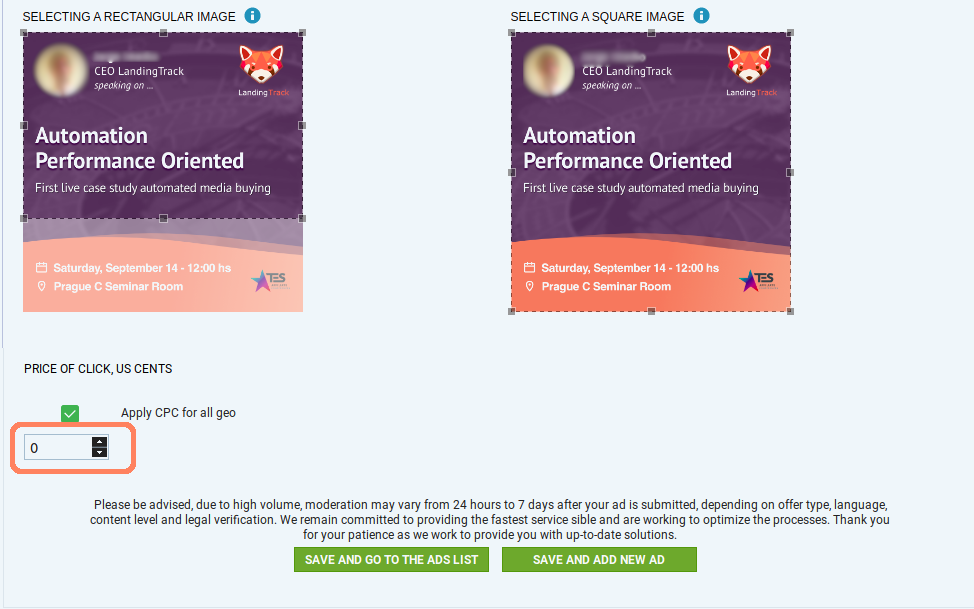
Congrats¡ as Adskeeper says — try to add at l east 10 teasers then, you can auto optimise them through LandingTrack; one of the main benefits of Automation.

Back to your Adskeeper Dashboard, you will see your new Campaign listed. We recommend you to COPY the campaign ID — IE: 917576 and Paste it on your Dimension > button Sync.
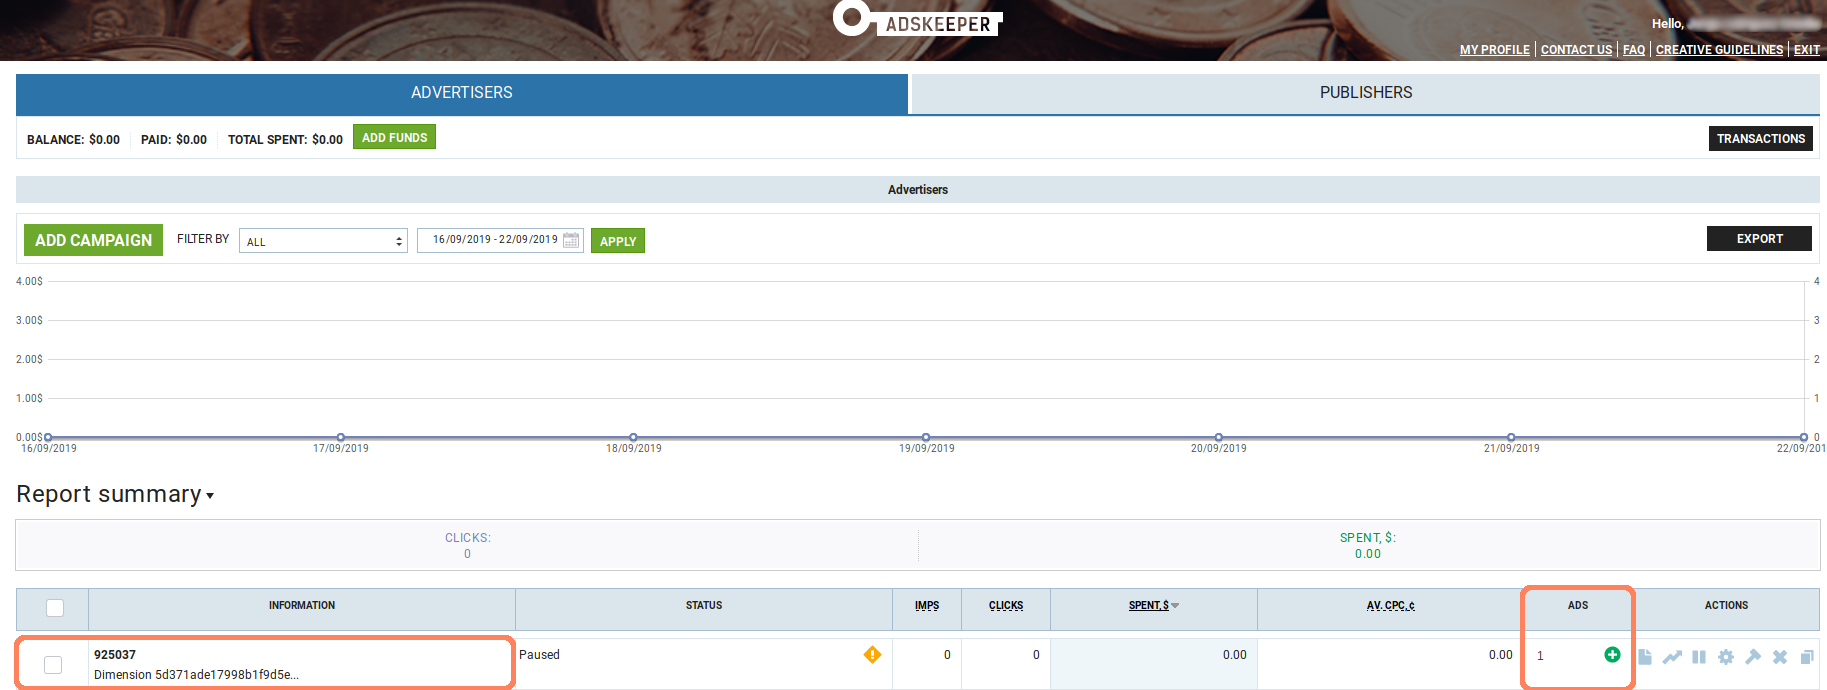
COPY CAMPAIGN ID — Paste on DImension LandingTrack to sync campaign.
And this is the view from our Ad (Teaser) on Adskeeper dashboard:

IMPORTANT — once you have created your campaign on Adskeeper — copy the Campaign ID and back on your Dimension profile click on button > SYNC — select Adskeeper and paste the ID. This action will make LandingTrack go and look for your Campaign.
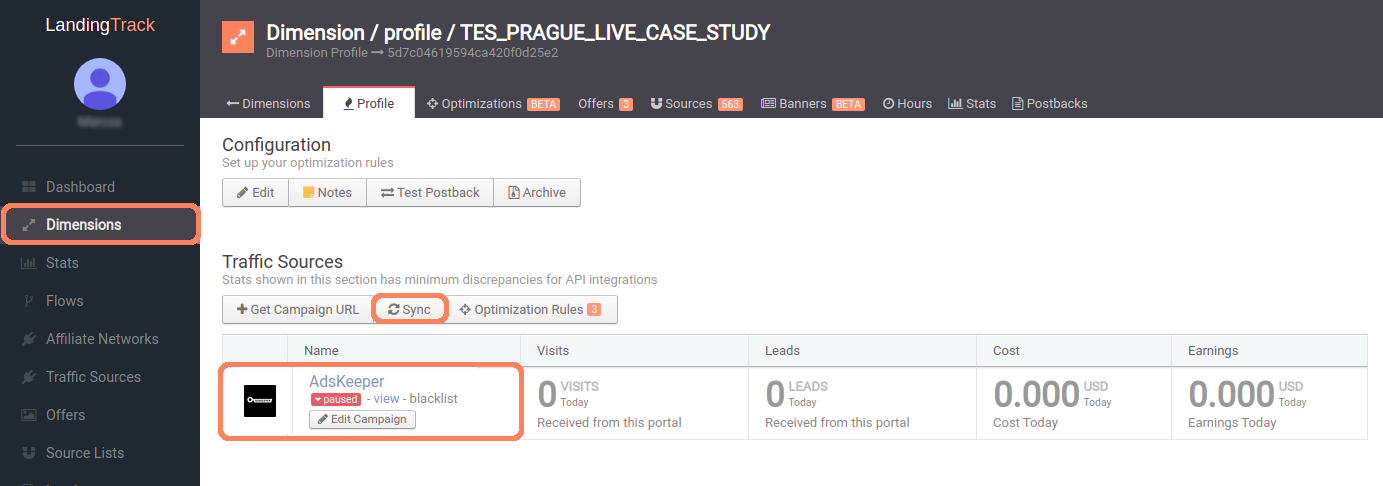
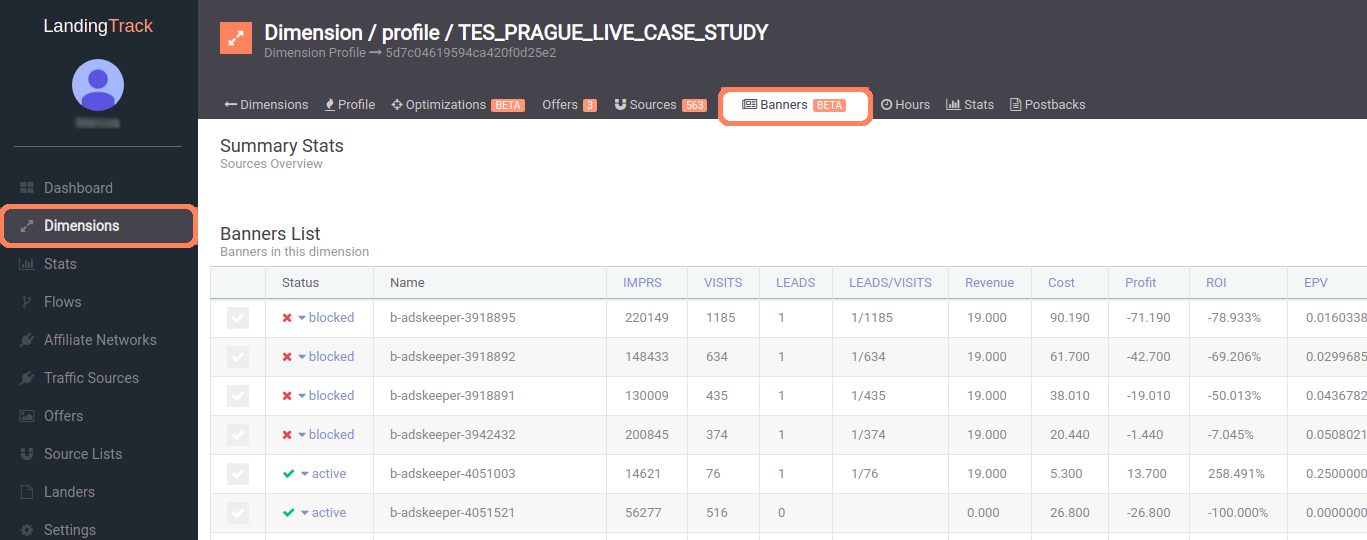
Our New Banners TAB — in action: control all your Adskeeper Teaser from here, block or unblock them.
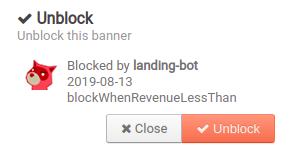
Click on the banner Status to know the reason why -
Everything has been set up already, our advice — Chill, relax and wait for the traffic to start.
These are the benefits of automation and how it can help your daily activity. What are you waiting for to start with LandingTrack?
And what is a Good Deal here?
LandingTrack clients get a 25% bonus on their FIRST deposit. Deposit at least $500 and get an additional $125 added to your account, or go further and get $250 on top if you deposit $1000. Follow the link below to sign up!
-----------SIGN UP---------
This is BIG! Now you can also Track and Auto_optimice all your Native Ads Campaigns with @LandingTrack !! Yes!
That is why we would like you to know that one of our First integrations for NATIVE ADS is:
Adskeeper Team: "We are excited to announce that LandingTrack has partnered with Adskeeper, a fast-growing native ads and push notification platform, to offer you an exclusive deal!
Being partners with more than 3k websites, AdsKeeper helps advertisers and affiliates acquire engaged audience through personalized content recommendations and push notifications. AdsKeeper is a leader in the adult industry market, expanding its inventory and providing 2 billion adult recommendations daily."
Let' s get started!
STEP 1 — Adding AdsKeeper as Traffic Source
Go to Traffic Source Tab and click on > +Connect new Source; from the list of options select > Integrated DPSd

Look for AdsKeeper. In order to connect with them, you will need a total of 2 fields to be filled.
1- Your AdsKeeper email for the field Users
2- Your AdsKeeper Password for the field Password

After saving LandingTrack will ask you to double-check your credentials, just Click on Check API button

Check your credentials and click on Check API button again.

Green Check¡ means we are fully Integrated with AdsKeeper but, We will suggest you add some more steps such us — URL Tokens and Outgoing Postback

Now that we are synchronized with AdsKeeper let’s have a look on > Edit button.
The following Parameters and Tokens will be provided by default for each AdsKeeper URL :
- s={widget_id} — (the one need it in order to track the site)
- bid={click_price} — The cost of the visit (how much you pay for a click)
- cmp={campaign_id} — Campaign ID, as registered in their system
- Keyword={category_id} — Category where your ad will be displayed.
- b={teaser_id} — ID of the banner displayed.
Since you will need to add Banners no worries, this option comes later on, Once we generate the Campaign URL
STEP 2 — Creating a Dimension on LandingTrack
Your DImension Profile:

Want to know everything About Dimensions? see full guide HERE
— Dimension Configuration Options:

See full guide HERE
— Dimension Traffic Sources Section:

See full guide HERE
— Get Campaign URL:

— Optimization Rules:

As you may know already, LandingTrack can optimize the traffic base on different rules and NOW even more!, here its when automation comes into action :
You can start working on your Optimization rules, remember that LandingTrack will automatize your banners and source, every minute.

We have selected the option Banners, meaning that LandingTrack for the example above will pause/block your banner if the impressions receive are higher than 2.500 and the Visits (Clicks) on your banner are less than 15.
You can always check our guide here — to refresh the concept.
— Getting the URL for Adskeeper:
Click on button > + Add Campaign and select Adskeeper as your traffic source, then select your Domain and your Traffic Segment; Finally, copy the name and URL we provide you with:
IMPORTANT: Copy the Full name that we provide you with and the Full URL:

REMEMBER: Use the Dimension name on Adskeeper Campaign Name and LandingTrack URL for the Campaign URL.
--------------------------------------------------------
STEP 3 — Creating a campaign on Adskeeper
Once you have log in to your Adskeeper Account click on > ADD campaign

Remember we are an Advertiser for Adskeeper (Buying Traffic from them)
The first thing to do will be adding your Campaign name — Do not forget to copy/paste the whole name LandingTrack provide you with. IE: Dimension 5d7251….
Select your Campaign type:
1- NOT DEFINED
2- PRODUCT PROMOTIONS
3- CONTENT PROMOTIONS
4- PUSH
And right after that your Campaign Category and Campaign Language. This will be basically where you would like to advertise your advertiser materials.

We have selected the option — Block before shown (ON) which means that after the campaign has been approved by the Adskeeper team, it will not start, instead it will be paused.
Next move will be for TARGETING:
Select your country/geo where you would like to promote your advertiser materials

Adskeeper has a cool Feature here, click on button > TRAFFIC INSIGHTS to find out all the traffic and bids per geo:

Pretty useful ha? and even a quick button > ADD CAMPAIGN to target a specific country.
After filling your Targeting options click on button > CONFIRM to keep setting up your Campaign at Adskeeper.
Next step will be Schedule, you can either set it up on Adskeeper :

Or start using all the automation that LandingTrack can offer to you > OPtimization Rules:

Once you have decided when you would like to be running your Advertising materials with Adskeeper it is time to move to the following options:
1- LIMITS: set caps for your campaign base on Clicks / Budget or Conversions. But again, it is time for you to set up all those rules on LandingTRack to start working with automation.
2- TRACKING TAGS: You can set up UTM or any custom tracking tags.
2.1 UTM Tagging: Choose this in case you are using Google Analytics to track the performance
utm_content tag value is automatically filled with teaser ID
utm_term tag value is automatically filled with widget ID
2.2 Add custom tracking tag : If you need to add any custom tracking instead of Google Analytics you need to use this option:
Allowed characters: 0–9, A-Z, a-z, -, _, =, +, &, /, :, ^ . The following macros tags are also allowed: {widget_id}, {teaser_id}, {campaign_id}, {geo}, {geo_region}, {ifa}, {click_id}. {click_id}- When you use these macros, please pay attention (take into account) that click status might be reconsidered as non-relevant after the fact. If you are not sure — seek assistance

Once you have finished we should look at the next step: CONVERSION SENSOR:
This section is for you to send conversions back to Adskeeper platform so you can check your stats also with them.
This is the Postback from Adskeeper: http://a.adskeeper.co.uk/postback?c={{PID}}&e=action350856&r={{PAYOUT}}
Just copy-paste yours, and let’s set it up on LandingTrack. Menu side click on > Traffic Sources and select Adskeeper, then click on

Easy right?
Once we have finished:

Time to create your Teaser Campaign, remember we are running Native Ads and would be needing an image, headline and body text for your advertiser material.
After clicking on button > CREATE we will have to add your LandingTrack Campaign URL, write your Teaser Title, select your category and finally upload your image.

Adskeeper has a cool Feature to crop your image, use it wisely.

Finally after adding your image and crop it, select the CPC price for all your Teaser Materials.

Congrats¡ as Adskeeper says — try to add at l east 10 teasers then, you can auto optimise them through LandingTrack; one of the main benefits of Automation.

Back to your Adskeeper Dashboard, you will see your new Campaign listed. We recommend you to COPY the campaign ID — IE: 917576 and Paste it on your Dimension > button Sync.

COPY CAMPAIGN ID — Paste on DImension LandingTrack to sync campaign.
And this is the view from our Ad (Teaser) on Adskeeper dashboard:

IMPORTANT — once you have created your campaign on Adskeeper — copy the Campaign ID and back on your Dimension profile click on button > SYNC — select Adskeeper and paste the ID. This action will make LandingTrack go and look for your Campaign.

Our New Banners TAB — in action: control all your Adskeeper Teaser from here, block or unblock them.

Click on the banner Status to know the reason why -

Everything has been set up already, our advice — Chill, relax and wait for the traffic to start.
These are the benefits of automation and how it can help your daily activity. What are you waiting for to start with LandingTrack?
And what is a Good Deal here?
LandingTrack clients get a 25% bonus on their FIRST deposit. Deposit at least $500 and get an additional $125 added to your account, or go further and get $250 on top if you deposit $1000. Follow the link below to sign up!
-----------SIGN UP---------


